In this tutorial, we will build a reactive non-blocking web stack using Spring Boot 2, Spring WebFlux, and MongoDB. The need for non-blocking web stack is to handle concurrency with a small number of threads and scale with fewer hardware resources.
TL;DR – SmtC
Too Long; Didn’t Read – Show me the Code: https://github.com/iseif/reactive-rest-api
Spring WebFlux
Spring WebFlux choose Reactor as its reactive library. Reactor provides the Mono and Flux API types to work on data sequences of 0..1 (Mono) and 0..N (Flux) through a rich set of operators. Reactor is a Reactive Streams library and, therefore, all of its operators support non-blocking back pressure. Reactor has a strong focus on server-side Java. It is developed in close collaboration with Spring. A WebFlux API accepts a plain Publisher as input, adapts it to a Reactor type internally, uses that, and returns either a Flux or a Mono as output (an introduction to Reactor can be found in the following blog post: https://iseif.dev/2019/03/13/what-is-reactor/).
Overall, Spring WebFlux provides a choice of two programming models:
- Annotated Controllers: Consistent with Spring MVC and based on the same annotations from the spring-web module. Both Spring MVC and WebFlux controllers support reactive (Reactor and RxJava) return types, and, as a result, it is not easy to tell them apart. One notable difference is that WebFlux also supports reactive @RequestBody arguments. This is the easiest way of getting started with the Spring WebFlux stack.
- Functional Endpoints: Lambda-based, lightweight, and functional programming model. You can think of this as a small library or a set of utilities that an application can use to route and handle requests. The big difference with annotated controllers is that the application is in charge of request handling from start to finish versus declaring intent through annotations and being called back. The application can be configured as a set of routes, handlers, and filters. It then enables passing all of these as lambda functions in order to build the application in a functional paradigm.
In this tutorial, we will use the Annotated Controllers model. So, let’s begin.
Tools we will use
We will use the following tools to build our REST microservice API:
- Java 8+
- Maven
- Spring Boot 2.1+
- MongoDB
I use JetBrains IntelliJ as my IDE – you can use whatever you feel comfortable with.
Initializing the Project
You can use your IDE to initialize the Spring Boot skeleton project, or you can use the Spring Initializr web tool.
Let’s proceed with the Spring Initializer. Open the web-page and choose Maven Project, Java, Spring Boot 2.1.4 (the latest when writing this tutorial), and fill the following information:
- Group: dev.iseif
- Artifact: reactive-rest-api
- Name: reactive-rest-api
- Description: A demo of Reactive REST API using Spring WebFlux and MongoDB
- Package Name: dev.iseif.reactiverestapi
- Packaging: Jar
- Java Version: 8

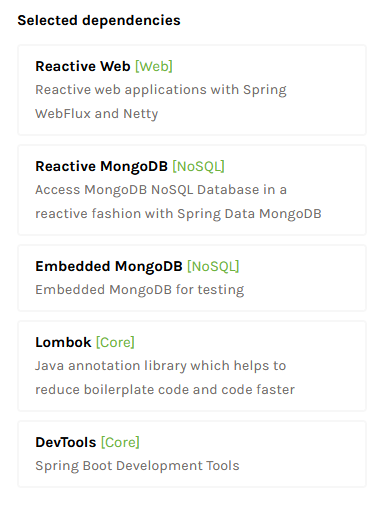
Now, in the Search dependencies to add section, add the following dependencies (search for the name, and select the dependency to be added):
- Reactive Web: Reactive web applications with Spring WebFlux and Netty – this is the main dependency that will enable us to write a reactive web application
- Reactive MongoDB: Access MongoDB NoSQL Database in a reactive fashion with Spring Data MongoDB. It is important to know that when you want to build a reactive web application and access to a database, you need to choose a database that supports reactive operations. For now, only MongoDB, Redis, Cassandra, and Couchbase support reactive access
- Embedded MongoDB: Embedded MongoDB for testing
- Lombok: Java annotation library which helps to reduce boilerplate code and code faster
- DevTools: Spring Boot Development Tools – it has many helpful tools as restarting the server each time you make a change instead of stopping and running the server manually each time.
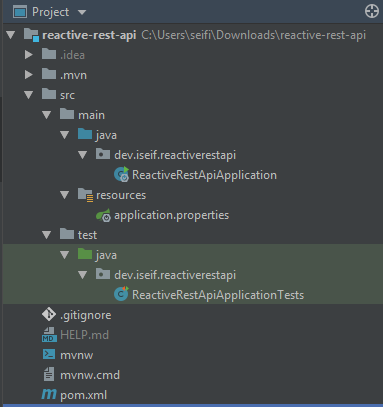
Now, click on Generate Project or press Alt+Enter to download the skeleton. After that, unzip the file and open the project in your favorite IDE.
Now, before we proceed with the code, let’s add one more dependency to the project. We will add the JUnit 5 dependency that we will use with our unit-tests. Open the pom.xml file and add the following dependency to the dependencies section:
<dependency>
  <groupId>org.junit.jupiter</groupId>
  <artifactId>junit-jupiter-api</artifactId>
  <version>5.3.2</version>
  <scope>test</scope>
</dependency>
before coding
Before we start the journey of the code, we need have two things, one an instance of running MongoDB and a Lombok plugin support to your IDE (if you are using IntelliJ).
For MongoDB, you have 4 options, choose one of the following options to proceed with:
- Download and Install MongoDB Server in your machine
- Use docker container, see the MongoDB section in the Docker Basics blog post
- Use one of MongoDB providers, as MongoDB Atlas or mLab – after creating your MongoDB in one of the sites, follow the instructions and copy your DB connection string and add it to the application.properties file in the resources folder in the project.
- Use the embedded MongoDB dependency, in the pom.xml file, just remove the <scope>test</scope> from the de.flapdoodle.embed.mongo dependency (don’t use this option in production applications!)
Second, check if your IDE has a plugin for Lombok as IntelliJ, Eclipse, and Netbeans. I will write a post about Lombok in the future.
our rest api application
In this demo, we will write an e-commerce product store REST API. Our application will support the following actions:
- Creating a new product
- Updating a product
- Deleting a product
- Getting all the products in the database
- Getting a specific product by ID
- Searching for products by title
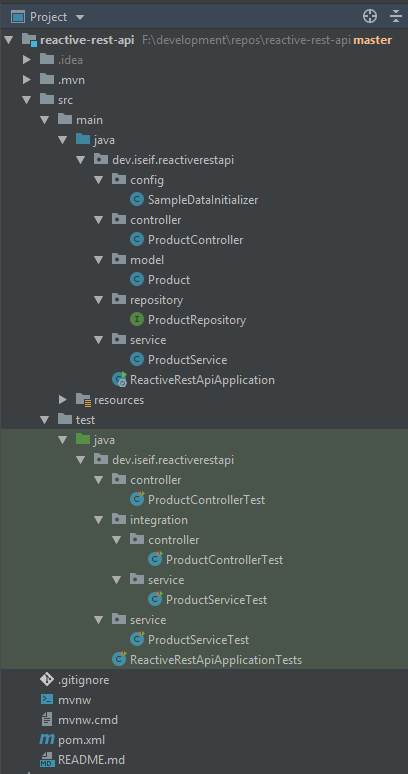
By the end of the tutorial, we will end with the following project structure and Java files:
Preparing the model
First of all, let’s define our model. I prefer having a separate package that will host our model, so, create a new package with the name model and inside the model, create a new class called Product.java. To keep it simple, and because it is just an example, let’s define the following fields that will define our Products:
- ID
- Title
- Description
- Price
In real-world applications, you may consider having more fields as Brand, Model, UPC, MPN, etc… But here, we will keep our model as simple as possible. The following code will represent our Product model:
package dev.iseif.reactiverestapi.model;

import javax.validation.constraints.NotBlank;
import javax.validation.constraints.NotNull;
import javax.validation.constraints.Positive;
import lombok.AllArgsConstructor;
import lombok.Builder;
import lombok.Data;
import lombok.EqualsAndHashCode;
import lombok.NoArgsConstructor;
import org.springframework.data.annotation.Id;
import org.springframework.data.mongodb.core.mapping.Document;

@Document
@Data
@NoArgsConstructor
@AllArgsConstructor
@Builder(toBuilder = true)
public class Product {

  @EqualsAndHashCode.Exclude
  @Id
  private String id;

  @NotBlank(message = "'title' is required")
  private String title;

  @NotBlank(message = "'description' is required")
  private String description;

  @NotNull(message = "'price' is required")
  @Positive(message = "'price' must be greater than zero")
  private Double price;
}
First, let’s go over all the class-level annotations:
- @Document: Because we are working with MongoDB database, we define our Product model to persisted in MongoDB
- @Data: This is from Lombok. It is a compile-time annotation that tells Lombok to generate getters, setters, toString() method, hashCode() method and an equals() method. This is a shortcut for @ToString, @EqualsAndHashCode, @Getter and @Setter on all non-final fields, and @RequiredArgsConstructor.
- @NoArgsConstructor and @AllArgsConstructor: Also Lombok annotations that tell Lombok to generate a no-args constructor and all-args constructor (from all the fields)
- @Builder(toBuilder = true): The @Builder annotation produces complex builder APIs for your classes. (toBuilder = true) generate an instance method in your class called toBuilder(); it creates a new builder that starts out with all the values of this instance.
Now, the model fields also have their own configurations (annotations):
- id: is annotated with @EqualsAndHashCode.Exclude and @Id. @EqualsAndHashCode.Exclude tells Lombok to ignore this field from the generated equals() and hashCode() methods. While, @Id is a Spring Data annotation that identifies the document ID for this document by this field.
- title, description, and price: all are annotated with bean validation constraints that will validate the data we are about to initialize our instances with if they meet these criteria as, @NotBlank will make sure the annotated element must not be null and must contain at least one non-whitespace character. @NotNull will make sure the annotated element is not null. While @Positive will check if the annotated element is a strictly positive number (greater than zero) – zero is considered as an invalid value.
CREATING THE REPOSITORY
Now, after creating our model, it is the time to create the model-repository which will help us perform actions against the document in the DB. We will use Spring Data to encapsulate object persistence. Creating a repository using Spring Data is very simple and it helps us focus on the business-logic rather than writing all the relevant drivers, actions we need against the database. To enrich your model with all the basic DB-actions such as, persistence – creating new records, updating them or deleting records; also, searching and filtering your records, you need just to create an interface which extends one of Spring Data interfaces. In our case, because we are writing a reactive application with MongoDB, we need to create an interface which will extend the ReactiveMongoRepository interface. and, that’s it, then we can use this interface to perform save(), find(), delete(), etc… on the Product collection.
To create the ProductRepository class, let’s create a package called repository and inside it, create ProductRepository.java class:
package dev.iseif.reactiverestapi.repository;

import dev.iseif.reactiverestapi.model.Product;
import org.springframework.data.mongodb.repository.ReactiveMongoRepository;
import reactor.core.publisher.Flux;

public interface ProductRepository extends ReactiveMongoRepository<Product, String> {

  Flux<Product> findByTitleContainingIgnoreCase(String title);
}
Here, our ProductRepository class extends ReactiveMongoRepository<Product, String> – where the Product is our document type and the String the ID of this document. By adding this, we will get a large set of methods out-of-the-box as:
- Flux<Product> findAll()
- Mono<Product> findById(String id)
- Mono<Void> delete(Product product)
- Mono<Void> deleteById(String id)
- Mono<Void> deleteAll()
- Mono<Long> count()
- Mono<Boolean> existsById()
Spring Data also allows us creating new queries using Spring Data JPA as the query I created to find records by title – so instead of writing the whole query, you just need to follow Spring Data JPA format and it will do all the work for you (I will write a whole blog post on Spring Data JPA). So, the findByTitleContainingIgnoreCase method will helo us searching for products by their title. We will see examples for how to use these methods shortly.
Writing the product service
I prefer using the repository to implement a service that will contain any course grained business logic – so instead of having a lot of business logic in the REST controller, we will add it to this service. In the beginning, a lot of the business logic will be pass-through logic delegating to the repository, but, in the future, we can add validation and integration with other systems at the service layer.
In this tutorial, our service won’t have a lot of business-logic, most of the methods will be just delegation to the corresponding repository methods. Let’s create a package called service and add our product service class:
package dev.iseif.reactiverestapi.service;

import dev.iseif.reactiverestapi.model.Product;
import dev.iseif.reactiverestapi.repository.ProductRepository;
import org.springframework.stereotype.Service;
import reactor.core.publisher.Flux;
import reactor.core.publisher.Mono;

@Service
public class ProductService {

  private final ProductRepository productRepository;

  public ProductService(ProductRepository productRepository) {
    this.productRepository = productRepository;
  }

  public Flux<Product> getAll() {
    return productRepository.findAll();
  }

  public Mono<Product> getById(String id) {
    return productRepository.findById(id);
  }

  public Flux<Product> searchByTitle(String title) {
    return productRepository.findByTitleContainingIgnoreCase(title);
  }

  public Mono<Product> create(Product product) {
    return productRepository.save(product);
  }

  public Mono<Product> update(String id, Product updatedProduct) {
    return productRepository.findById(id)
        .map(existingProduct -> existingProduct.toBuilder()
              .title(updatedProduct.getTitle())
              .description(updatedProduct.getDescription())
              .price(updatedProduct.getPrice())
              .build())
        .flatMap(productRepository::save);
  }

  public Mono<Product> deleteById(String id) {
    return productRepository.findById(id)
        .flatMap(product -> productRepository.delete(product).then(Mono.just(product)));
  }
}
We first define our class with @Service annotation to let Spring create a bean for it and then we inject the ProductRepository class to be used by this class.
Then we start defining the methods the service will support:
- getAll(): this method will just call the findAll() method in the repository and return a Flux<Product>
- getById(String id): it will be used to get a product by its ID – will return a Mono<Product>
- searchByTitle(String title): just a delegation to the repository’s findByTitleContainingIgnoreCase() method
- create(Product product): will get a product and call the save() method in the repository
- update(String id, Product updatedProduct): this method has a small business-logic. It gets the ID of the product we need to update, and the new updated product and, first gets the product from the DB and then update the fields, then we call the toBuilder() method of the existing product and update its fields with the new provided data. Notice that we don’t update the ID field because we are not expecting it to be updated. After that, we call the repository.save(Product product) method to persist the update. Notice that findById() and the map() action, will return a Mono<Mono<Product>> – therefore, we need to use flatMap() to convert it into Mono<Product>
- deleteById(String id): in this method, we could directly use the repository’s delete() or deleteById() methods – but they both return Mono<Void> with no indication if the product was exist in the DB or not. Because of that I used the findById() and then, if the product exists, I called the delete() method and returned the product so the caller of this method can know if the product was found or not (the use of the then() method).
tESTING OUR sERVICE
Let’s write tests for our service. We are going to write two types of tests, a unit tests with mock data (we will mock our repository) and we will also write an integration test, we will test our service with real data with interacting with a real MongoDB to test our methods.
First, let’s start with the unit tests. We will use Mockito for mocking and we will use StepVerifier for testing the Flux and Mono (see Testing Reactor Publishers section in the What is Reactor? post for more details about StepVerifier). Under src/test/java/dev/iseif/reactiverestapi create a service package and a ProductServiceTest.java file:
package dev.iseif.reactiverestapi.service;
import static org.mockito.Mockito.when;
import dev.iseif.reactiverestapi.model.Product;
import dev.iseif.reactiverestapi.repository.ProductRepository;
import org.junit.jupiter.api.BeforeEach;
import org.junit.jupiter.api.Test;
import org.junit.jupiter.api.extension.ExtendWith;
import org.mockito.Mock;
import org.reactivestreams.Publisher;
import org.springframework.test.context.junit.jupiter.SpringExtension;
import reactor.core.publisher.Flux;
import reactor.core.publisher.Mono;
import reactor.test.StepVerifier;
@ExtendWith(SpringExtension.class)
class ProductServiceTest {
private final Product product1 = Product.builder().title("Apple iPhone XS Max").description("New iPhone XS Max").price(1099.99).build();
private final Product product2 = Product.builder().title("Apple MacBook Pro").description("New MacBook").price(2599.99).build();
private final Product product3 = Product.builder().title("Samsung Galaxy S10+").description("New Galaxy!!").price(799.99).build();
@Mock
private ProductRepository productRepository;
private ProductService productService;
@BeforeEach
void setUp() {
productService = new ProductService(productRepository);
}
@Test
void getAll() {
when(productRepository.findAll()).thenReturn(Flux.just(product1, product2, product3));
Flux<Product> actual = productService.getAll();
assertResults(actual, product1, product2, product3);
}
@Test
void getById_whenIdExists_returnCorrectProduct() {
when(productRepository.findById(product1.getId())).thenReturn(Mono.just(product1));
Mono<Product> actual = productService.getById(product1.getId());
assertResults(actual, product1);
}
@Test
void getById_whenIdNotExist_returnEmptyMono() {
when(productRepository.findById(product1.getId())).thenReturn(Mono.empty());
Mono<Product> actual = productService.getById(product1.getId());
assertResults(actual);
}
@Test
void searchByTitle() {
final String title = "apple";
when(productRepository.findByTitleContainingIgnoreCase(title)).thenReturn(Flux.just(product1, product2));
Flux<Product> actual = productService.searchByTitle(title);
assertResults(actual, product1, product2);
}
@Test
void create() {
when(productRepository.save(product1)).thenReturn(Mono.just(product1));
Mono<Product> actual = productService.create(product1);
assertResults(actual, product1);
}
@Test
void update_whenIdExists_returnUpdatedProduct() {
when(productRepository.findById(product1.getId())).thenReturn(Mono.just(product1));
when(productRepository.save(product1)).thenReturn(Mono.just(product1));
Mono<Product> actual = productService.update(product1.getId(), product1);
assertResults(actual, product1);
}
@Test
void update_whenIdNotExist_returnEmptyMono() {
when(productRepository.findById(product1.getId())).thenReturn(Mono.empty());
Mono<Product> actual = productService.update(product1.getId(), product1);
assertResults(actual);
}
@Test
void delete_whenProductExists_performDeletion() {
when(productRepository.findById(product1.getId())).thenReturn(Mono.just(product1));
when(productRepository.delete(product1)).thenReturn(Mono.empty());
Mono<Product> actual = productService.deleteById(product1.getId());
assertResults(actual, product1);
}
@Test
void delete_whenIdNotExist_returnEmptyMono() {
when(productRepository.findById(product1.getId())).thenReturn(Mono.empty());
Mono<Product> actual = productService.deleteById(product1.getId());
assertResults(actual);
}
private void assertResults(Publisher<Product> publisher, Product... expectedProducts) {
StepVerifier
.create(publisher)
.expectNext(expectedProducts)
.verifyComplete();
}
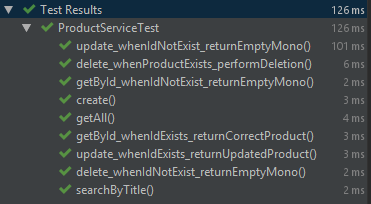
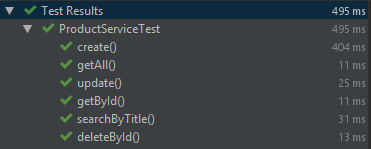
}The tests are trivial and self-explained, we tested many scenarios as:
- getAll(): we mocked the repository in that it will return a Flux of three products and when we called the productService.getAll() we checked that we actually got what we expect to get
- getById(): we tested the getById() method in two ways, one when the id exists and another test when the id does not exist and in both cases, we verified that we got the expected Mono<Product> and Mono.empty() correspondingly
- delete(): in the delete() tests we tested two scenarios, one when the product exists in the database and another test when the product does not exist, in the first case, we expect to get a Mono<Product> and in the second case we expect to get an empty Mono
- In the method assertResults() we will verify the Flux and Mono we are getting, the method is simple, we get a Publisher (which will be a Flux or Mono) and the expected products in the provided Publisher. Then we create a StepVerifier and check if the expected products are in the Publisher. When we send an empty publisher, the expectNext() method won’t be called, and we will test only completion of the publisher because it is empty.
Running the tests will give us the following results:
Now, let’s create our second test, testing real data with a MongoDB database. Here, the test will use the embedded in-memory MongoDB we added in the pom.xml:
<dependency>
  <groupId>de.flapdoodle.embed</groupId>
  <artifactId>de.flapdoodle.embed.mongo</artifactId>
  <scope>test</scope>
</dependency>
The ProductServiceTest.java here is very similar to the unit-tests file with mock data, but with small changed:
package dev.iseif.reactiverestapi.integration.service;

import dev.iseif.reactiverestapi.model.Product;
import dev.iseif.reactiverestapi.repository.ProductRepository;
import dev.iseif.reactiverestapi.service.ProductService;
import java.util.Arrays;
import java.util.List;
import org.apache.commons.lang3.StringUtils;
import org.junit.jupiter.api.BeforeEach;
import org.junit.jupiter.api.Test;
import org.junit.jupiter.api.extension.ExtendWith;
import org.springframework.beans.factory.annotation.Autowired;
import org.springframework.boot.test.autoconfigure.data.mongo.DataMongoTest;
import org.springframework.context.annotation.Import;
import org.springframework.test.context.junit.jupiter.SpringExtension;
import reactor.core.publisher.Flux;
import reactor.core.publisher.Mono;
import reactor.test.StepVerifier;

@ExtendWith(SpringExtension.class)
@DataMongoTest
@Import(ProductService.class)
class ProductServiceTest {

  private final Product product1 = Product.builder().title("Apple iPhone XS Max").description("New iPhone XS Max").price(1099.99).build();
  private final Product product2 = Product.builder().title("Apple MacBook Pro").description("New MacBook").price(2599.99).build();
  private final Product product3 = Product.builder().title("Samsung Galaxy S10+").description("New Galaxy!!").price(799.99).build();

  @Autowired
  private ProductRepository productRepository;

  @Autowired
  private ProductService productService;

  private List<Product> allProducts;

  @BeforeEach
  void setUp() {
    Flux<Product> initData = productRepository.deleteAll().thenMany(
        Flux.just(product1, product2, product3)
            .flatMap(productRepository::save)).thenMany(productRepository.findAll());

    allProducts = initData.collectList().block();
  }

  @Test
  void getAll() {
    Flux<Product> actual = productService.getAll();

    StepVerifier
        .create(actual)
        .expectNextMatches(allProducts::contains)
        .expectNextMatches(allProducts::contains)
        .expectNextMatches(allProducts::contains)
        .verifyComplete();
  }

  @Test
  void getById() {
    Product expectedProduct = allProducts.get(0);

    Mono<Product> actual = productService.getById(expectedProduct.getId());

    StepVerifier
        .create(actual)
        .expectNext(expectedProduct)
        .verifyComplete();
  }

  @Test
  void searchByTitle() {
    final String title = "apple";
    List<Product> expectedProducts = Arrays.asList(product1, product2);

    Flux<Product> actual = productService.searchByTitle(title);

    StepVerifier
        .create(actual)
        .expectNextMatches(expectedProducts::contains)
        .expectNextMatches(expectedProducts::contains)
        .verifyComplete();
  }

  @Test
  void create() {
    Product product = Product.builder().title("New Test Product").description("Test Product").price(299.99).build();

    Mono<Product> actual = productService.create(product);

    StepVerifier
        .create(actual)
        .expectNextMatches(actualProduct -> actualProduct.equals(product) && StringUtils.isNotBlank(actualProduct.getId()))
        .verifyComplete();
  }

  @Test
  void update() {
    Product productToUpdate = allProducts.get(0);
    Product updatedProduct = Product.builder().title("New Updated Title").description("Updated").price(299.99).build();

    Mono<Product> actual = productService.update(productToUpdate.getId(), updatedProduct)
        .flatMap(product -> productRepository.findById(productToUpdate.getId()));

    StepVerifier
        .create(actual)
        .expectNextMatches(actualProduct -> actualProduct.equals(updatedProduct))
        .verifyComplete();
  }

  @Test
  void deleteById() {
    Product productToDelete = allProducts.get(0);

    Mono<Product> actual = productService.deleteById(productToDelete.getId())
        .flatMap(product -> productRepository.findById(productToDelete.getId()));

    StepVerifier
        .create(actual)
        .verifyComplete();
  }
}
Here, we first added two new annotations, @DataMongoTest and @Import(ProductService.class). The @DataMongoTest will tell Spring to configure the in-memory embedded MongoDB, configure a MongoTemplate, scan for @Document classes and configure Spring Data MongoDB repositories. Regular @Component beans will not be loaded into the ApplicationContext. The @Import(ProductService.class) will add our service for testing.
Next, before each test we delete the data from the database, then create new data to be used in each test. The block() method in the initData.collectList().block(), will till reactor to wait for the results (don’t forget that we are using async calls).
In the update() and delete() tests, after making the call to the service, we try to get the updated/delete products from the database to verify the action.
Running the tests will give us the following results:
Writing the Controller
Now, after we finished with the service, we are ready to write our REST controller. In Spring WebFlux, there are two annotations used to create controllers (this is in line with SpringMVC):
- @Controller: Defines a generic web component. Given a request, it creates a model object and generates a dynamic view response for it
- @RestController: Defines a RESTful web service. Given a request, it returns a response as JSON (or XML)
Each of these controllers serves a request pattern. Following are the annotations that can be used to define the request patterns served by a controller:
- @RequestMapping: This is the main annotation in the controller. It is used to mark a controller. It defines the request pattern prefix (it can also be used to define request headers, media types, HTTP methods, and so on)
- @GetMapping: This annotation is used to define a GET HTTP request URL
- @PostMapping: This annotation is used to define a POST HTTP request URL
- @PutMapping: This annotation is used to define a PUT HTTP request URL
- @DeleteMapping: This annotation is used to define a DELETE HTTP request URL
- @PatchMapping: This annotation is used to define a PATCH HTTP request URL
It is important to note that @RequestMapping matches all HTTP request methods.
Now, let’s create our ProductController:
package dev.iseif.reactiverestapi.controller;

import dev.iseif.reactiverestapi.model.Product;
import dev.iseif.reactiverestapi.service.ProductService;
import java.net.URI;
import javax.validation.Valid;
import org.springframework.http.ResponseEntity;
import org.springframework.web.bind.annotation.DeleteMapping;
import org.springframework.web.bind.annotation.GetMapping;
import org.springframework.web.bind.annotation.PathVariable;
import org.springframework.web.bind.annotation.PostMapping;
import org.springframework.web.bind.annotation.PutMapping;
import org.springframework.web.bind.annotation.RequestBody;
import org.springframework.web.bind.annotation.RequestMapping;
import org.springframework.web.bind.annotation.RestController;
import reactor.core.publisher.Flux;
import reactor.core.publisher.Mono;

@RestController
@RequestMapping("/api/products")
public class ProductController {

  private final ProductService productService;

  public ProductController(ProductService productService) {
    this.productService = productService;
  }

  @GetMapping
  public Flux<Product> getAllProducts() {
    return productService.getAll();
  }

  @GetMapping("{id}")
  public Mono<ResponseEntity<Product>> getProductById(@PathVariable String id) {
    return productService.getById(id)
        .map(ResponseEntity::ok)
        .defaultIfEmpty(ResponseEntity.notFound().build());
  }

  @GetMapping("/search/{title}")
  public Flux<Product> searchByTitle(@PathVariable String title) {
    return productService.searchByTitle(title);
  }

  @PostMapping
  public Mono<ResponseEntity<Product>> createProduct(@RequestBody @Valid Product product) {
    Product productToCreate = product.toBuilder().id(null).build();
    return productService.create(productToCreate)
        .map(newProduct -> ResponseEntity.created(URI.create("/products/" + newProduct.getId())).body(newProduct));
  }

  @PutMapping("{id}")
  public Mono<ResponseEntity<Product>> updateProduct(@PathVariable String id, @RequestBody @Valid Product product) {
    return productService.update(id, product)
        .map(ResponseEntity::ok)
        .defaultIfEmpty(ResponseEntity.notFound().build());
  }

  @DeleteMapping("{id}")
  public Mono<ResponseEntity<Void>> deleteProduct(@PathVariable String id) {
    return productService.deleteById(id)
        .map(r -> ResponseEntity.ok().<Void>build())
        .defaultIfEmpty(ResponseEntity.notFound().build());
  }
}
The controller is simple. First we defines the class as @RestController to tell Spring that this is a RESTful controller. Then we define our controller’s path: @RequestMapping(“/api/products”). Here, we tell Spring that this controller will handle requests going to /api/products as for example: www.my-store.com/api/prodcuts. Next, we inject our ProductService and then start to define our routes/actions to be exposed by this controller:
- getAllProducts(): This method is annotated with @GetMapping with no path, means, this method will be called each time a GET request is made for the path /api/products. In this method, we just call the productService.getAll() method and returns a Flux<Product>.
- getProductById(@PathVariable String id): This method is annotated with @GetMapping(“{id}”). That means, that each GET request to the path /api/products/{id} will be mapped to this method. Notice that {id}, is a @PathVariable that will be mapped to the String id variable and will our Product ID. This path is used for getting a specific product from the database by its ID. In the method, first, we call the productService.getById(id) and, if the ID is found in the database, we mapped it to a ResponseEntity and return it as HTTP OK (200) response. If the product does not found, in this case, the ProductService will return a Mono.empty, we return an HTTP Not-Found (404) response.
- searchByTitle(@PathVariable String title): This method is used for searching our catalog by title. The method is annotated with @GetMapping(“/search/{title}”). So, each GET request for the path /api/products/search/{title} will be mapped to this methods. For example, if the following GET request /api/products/search/iphone is called, then we will call our productService.searchByTitle() method to search all the products for products that contain iphone in their title.
- createProduct(@RequestBody @Valid Product product): This method has the annotation @PostMapping. So each POST request to the /api/products will invoke this method. Here, we will take the request body and convert it into a Product and then call the productService.create() method to create the product in the database. notice that @Valid annotation in the method params, this will validate the given product data if they pass the validations we defined in our Product model. After creating the product, we return an HTTP CREATED (201) status with the created Product.
- updateProduct(): This method is annotated with @PutMapping(“{id}”), so each PUT request to the path /api/products/{id} will take the id variable from the path, and the Product data from the request body and calls the productService.update() with the id and the product to update the product data in the database.
- deleteProduct(): This method is annotated with @DeleteMapping(“{id}”). Now it is trivial, each DELETE request with a product ID will call the productService.deleteById() to delete the product.
Notice that each method supposed to return a single product, returns a Mono and if it returns more that one product, it should return a Flux.
Testing Our Controller
As we did with the ProductService, let’s also test our controller, to verify it is doing what we expect it to do.
When testing the controller, we will use WebTestClient which is a non-blocking, reactive client for testing web servers. It uses the reactive WebClient internally to perform requests and provides a fluent API to verify responses. WebTestClient can connect to any server over an HTTP connection. It can also bind directly to WebFlux applications using mock request and response objects, without the need for an HTTP server.
When configuring the WebTestClient, we define it to be bind to ApplicationContext or to a specific Controller and then we define baseUrl to be used in each request.
Let’s first create a unit-test class with mocking data:
package dev.iseif.reactiverestapi.controller;

import static org.mockito.Mockito.when;

import dev.iseif.reactiverestapi.model.Product;
import dev.iseif.reactiverestapi.service.ProductService;
import java.util.Arrays;
import java.util.List;
import org.junit.jupiter.api.BeforeEach;
import org.junit.jupiter.api.Test;
import org.junit.jupiter.api.extension.ExtendWith;
import org.mockito.Mock;
import org.springframework.test.context.junit.jupiter.SpringExtension;
import org.springframework.test.web.reactive.server.WebTestClient;
import reactor.core.publisher.Flux;
import reactor.core.publisher.Mono;

@ExtendWith(SpringExtension.class)
class ProductControllerTest {

  @Mock
  private ProductService productService;
  private WebTestClient client;
  private List<Product> expectedProducts;

  @BeforeEach
  void setUp() {
    client = WebTestClient
        .bindToController(new ProductController(productService))
        .configureClient()
        .baseUrl("/api/products")
        .build();

    expectedProducts = Arrays.asList(
        Product.builder().id("1").title("Apple iPhone XS Max").description("New iPhone XS Max").price(1099.99).build(),
        Product.builder().id("2").title("Apple MacBook Pro").description("New MacBook").price(2599.99).build(),
        Product.builder().id("3").title("Samsung Galaxy S10+").description("New Galaxy!!").price(799.99).build());
  }

  @Test
  void getAllProducts() {
    when(productService.getAll()).thenReturn(Flux.fromIterable(expectedProducts));

    client.get().uri("/").exchange()
        .expectStatus().isOk()
        .expectBodyList(Product.class).isEqualTo(expectedProducts);
  }

  @Test
  void getProductById_whenProductExists_returnCorrectProduct() {
    Product expectedProduct = expectedProducts.get(0);
    when(productService.getById(expectedProduct.getId())).thenReturn(Mono.just(expectedProduct));

    client.get().uri("/{id}", expectedProduct.getId()).exchange()
        .expectStatus().isOk()
        .expectBody(Product.class).isEqualTo(expectedProduct);
  }

  @Test
  void getProductById_whenProductNotExist_returnNotFound() {
    String id = "NOT_EXIST_ID";
    when(productService.getById(id)).thenReturn(Mono.empty());

    client.get().uri("/{id}", id).exchange()
        .expectStatus().isNotFound();
  }

  @Test
  void searchByTitle() {
    String title = "apple";
    List<Product> expectedFilteredProducts = Arrays.asList(expectedProducts.get(0), expectedProducts.get(1));
    when(productService.searchByTitle(title)).thenReturn(Flux.fromIterable(expectedFilteredProducts));

    client.get().uri("/search/{title}", title).exchange()
        .expectStatus().isOk()
        .expectBodyList(Product.class).isEqualTo(expectedFilteredProducts);
  }

  @Test
  void addProduct() {
    Product expectedProduct = expectedProducts.get(0);
    when(productService.create(expectedProduct)).thenReturn(Mono.just(expectedProduct));

    client.post().uri("/").body(Mono.just(expectedProduct), Product.class).exchange()
        .expectStatus().isCreated()
        .expectBody(Product.class).isEqualTo(expectedProduct);
  }

  @Test
  void updateProduct_whenProductExists_performUpdate() {
    Product expectedProduct = expectedProducts.get(0);
    when(productService.update(expectedProduct.getId(), expectedProduct)).thenReturn(Mono.just(expectedProduct));

    client.put().uri("/{id}", expectedProduct.getId()).body(Mono.just(expectedProduct), Product.class).exchange()
        .expectStatus().isOk()
        .expectBody(Product.class).isEqualTo(expectedProduct);
  }

  @Test
  void updateProduct_whenProductNotExist_returnNotFound() {
    String id = "NOT_EXIST_ID";
    Product expectedProduct = expectedProducts.get(0);
    when(productService.update(id, expectedProduct)).thenReturn(Mono.empty());

    client.put().uri("/{id}", id).body(Mono.just(expectedProduct), Product.class).exchange()
        .expectStatus().isNotFound();
  }

  @Test
  void deleteProduct_whenProductExists_performDeletion() {
    Product productToDelete = expectedProducts.get(0);
    when(productService.deleteById(productToDelete.getId())).thenReturn(Mono.just(productToDelete));

    client.delete().uri("/{id}", productToDelete.getId()).exchange()
        .expectStatus().isOk();
  }

  @Test
  void deleteProduct_whenIdNotExist_returnNotFound() {
    Product productToDelete = expectedProducts.get(0);
    when(productService.deleteById(productToDelete.getId())).thenReturn(Mono.empty());

    client.delete().uri("/{id}", productToDelete.getId()).exchange()
        .expectStatus().isNotFound();
  }
}
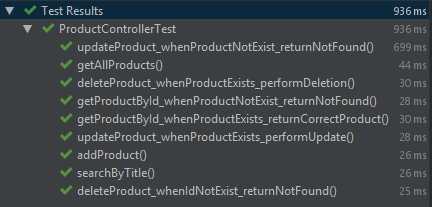
Here we defined the WebTestClient to be bindToController() providing our ProductController, and defined the path “/api/product” as the baseUrl. Then we start our tests:
- getAllProducts(): Here we mocked our ProductService to return three products, and then we used the WebTestClient to make a GET request to the baseUrl and checked that we got HTTP status 200 with the expected Product list in the body
- getProductById(): We made two tests for getting a Product by its ID. The first test, when the ID exists in the database, we tested that we got an HTTP status 200 with the expected Product in the body and another test, when the ID does not exist, here, we verify that we got an HTTP Not-Found status (404)
- searchByTitle(): Very similar to the getProductById() test
- addProduct(): Here, we test the POST request, calling the WebTestClient post() with a Product in the body, and check that an HTTP Created status is returned with the expected product
- updateProduct(): Testing the update Product path is easy, we call the put() method of the WebTestClient, with the Product ID, and in the body() we provide the changes we want to perform in the Product data. Here, we tested two scenarios, when the Product exists and when it does not exist
- deleteProduct(): Delete Product test is similar to the update test, but now with DELETE and with the Product ID we want to delete
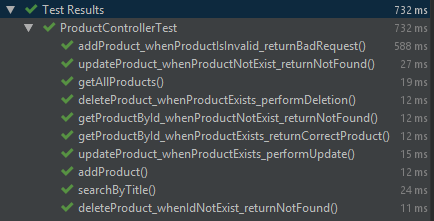
The integration test is very similar to the unit-tests, but this time we will load the whole ApplicationContext and perform the tests on the in-memory embedded MongoDB.
package dev.iseif.reactiverestapi.integration.controller;

import dev.iseif.reactiverestapi.model.Product;
import dev.iseif.reactiverestapi.repository.ProductRepository;
import java.util.Arrays;
import java.util.List;
import org.junit.jupiter.api.BeforeEach;
import org.junit.jupiter.api.Test;
import org.junit.jupiter.api.extension.ExtendWith;
import org.springframework.beans.factory.annotation.Autowired;
import org.springframework.boot.test.context.SpringBootTest;
import org.springframework.context.ApplicationContext;
import org.springframework.test.context.junit.jupiter.SpringExtension;
import org.springframework.test.web.reactive.server.WebTestClient;
import reactor.core.publisher.Flux;
import reactor.core.publisher.Mono;

@ExtendWith(SpringExtension.class)
@SpringBootTest
class ProductControllerTest {

  @Autowired
  private ApplicationContext applicationContext;
  @Autowired
  private ProductRepository productRepository;
  private WebTestClient client;
  private List<Product> expectedProducts;

  @BeforeEach
  void setUp() {
    client = WebTestClient
        .bindToApplicationContext(applicationContext)
        .configureClient()
        .baseUrl("/api/products")
        .build();

    Flux<Product> initData = productRepository.deleteAll()
        .thenMany(Flux.just(
          Product.builder().title("Apple iPhone XS Max").description("New iPhone XS Max").price(1099.99).build(),
          Product.builder().title("Apple MacBook Pro").description("New MacBook").price(2599.99).build(),
          Product.builder().title("Samsung Galaxy S10+").description("New Galaxy!!").price(799.99).build())
        .flatMap(productRepository::save))
        .thenMany(productRepository.findAll());

    expectedProducts = initData.collectList().block();
  }

  @Test
  void getAllProducts() {
    client.get().uri("/").exchange()
        .expectStatus().isOk()
        .expectBodyList(Product.class).isEqualTo(expectedProducts);
  }

  @Test
  void getProductById_whenProductExists_returnCorrectProduct() {
    Product expectedProduct = expectedProducts.get(0);

    client.get().uri("/{id}", expectedProduct.getId()).exchange()
        .expectStatus().isOk()
        .expectBody(Product.class).isEqualTo(expectedProduct);
  }

  @Test
  void getProductById_whenProductNotExist_returnNotFound() {
    String id = "NOT_EXIST_ID";

    client.get().uri("/{id}", id).exchange()
        .expectStatus().isNotFound();
  }

  @Test
  void searchByTitle() {
    String title = "apple";
    List<Product> expectedFilteredProducts = Arrays.asList(expectedProducts.get(0), expectedProducts.get(1));

    client.get().uri("/search/{title}", title).exchange()
        .expectStatus().isOk()
        .expectBodyList(Product.class).isEqualTo(expectedFilteredProducts);
  }

  @Test
  void addProduct() {
    Product expectedProduct = expectedProducts.get(0);

    client.post().uri("/").body(Mono.just(expectedProduct), Product.class).exchange()
        .expectStatus().isCreated()
        .expectBody(Product.class).isEqualTo(expectedProduct);
  }

  @Test
  void addProduct_whenProductIsInvalid_returnBadRequest() {
    Product product = Product.builder().title("title").description("").price(0.0).build();

    client.post().uri("/").body(Mono.just(product), Product.class).exchange()
        .expectStatus().isBadRequest();
  }

  @Test
  void updateProduct_whenProductExists_performUpdate() {
    Product expectedProduct = expectedProducts.get(0);

    client.put().uri("/{id}", expectedProduct.getId()).body(Mono.just(expectedProduct), Product.class).exchange()
        .expectStatus().isOk()
        .expectBody(Product.class).isEqualTo(expectedProduct);
  }

  @Test
  void updateProduct_whenProductNotExist_returnNotFound() {
    String id = "NOT_EXIST_ID";
    Product expectedProduct = expectedProducts.get(0);

    client.put().uri("/{id}", id).body(Mono.just(expectedProduct), Product.class).exchange()
        .expectStatus().isNotFound();
  }

  @Test
  void deleteProduct_whenProductExists_performDeletion() {
    Product productToDelete = expectedProducts.get(0);

    client.delete().uri("/{id}", productToDelete.getId()).exchange()
        .expectStatus().isOk();
  }

  @Test
  void deleteProduct_whenIdNotExist_returnNotFound() {
    String id = "NOT_EXIST_ID";

    client.delete().uri("/{id}", id).exchange()
        .expectStatus().isNotFound();
  }
}
The tests are very similar to the unit-tests, but this time without mocks. For that, before each test, we created new products in the database as a test data.
Running The Application
The last step now id to run our application and manually call our API using any REST client (as Postman).
Before running the application, let’s make it start with a demo data out-of-the-box. So instead to starting the application with an empty database, let’s make it load some Products. So, let’s create a class for data loading.
package dev.iseif.reactiverestapi.config;

import dev.iseif.reactiverestapi.model.Product;
import dev.iseif.reactiverestapi.repository.ProductRepository;
import lombok.extern.log4j.Log4j2;
import org.springframework.boot.context.event.ApplicationReadyEvent;
import org.springframework.context.ApplicationListener;
import org.springframework.context.annotation.Profile;
import org.springframework.stereotype.Component;
import reactor.core.publisher.Flux;

@Log4j2
@Component
@Profile("demo")
public class SampleDataInitializer implements ApplicationListener<ApplicationReadyEvent> {

  private final ProductRepository productRepository;

  public SampleDataInitializer(ProductRepository productRepository) {
    this.productRepository = productRepository;
  }

  @Override
  public void onApplicationEvent(ApplicationReadyEvent event) {
    productRepository.deleteAll()
        .thenMany(
            Flux.just(
              Product.builder().title("Apple iPhone XS Max").description("New iPhone XS Max").price(1099.99).build(),
              Product.builder().title("Apple MacBook Pro").description("New MacBook").price(2599.99).build(),
              Product.builder().title("Samsung Galaxy S10+").description("New Galaxy!!").price(799.99).build()
            ).flatMap(productRepository::save))
        .thenMany(productRepository.findAll())
        .subscribe(product -> log.info("Product created:\n" + product.toString()));
  }
}
Here, we will implement the ApplicationListener<ApplicationReadyEvent> and wait for the application to load and be ready, and then create the products. Here I used two annotations, the first one is @Log4j2 that is a Lombok annotation that simply will add a logger to the class. The second annotation is @Profile(“demo”) to tell Spring to run this only if the active profile is demo. I don’t want this data to load in production for example, I want to run this data only when I want to run a demo for example. To activate a profile, you can use the VM param: -Dspring.profiles.active=demo or in IntelliJ, in the Run/Debug Configuration window, you can write demo in the Active profiles textbox.
In the class itself, we inject the repository, and then on the ApplicationReadyEvent, we just create three new products and get the new products. This will return a Flux and on this Flux, we subscribe (to invoke it) and on each product, we print it to the logger.
Now, run the application with demo profile activated. When the application runs successfully, you will see an output similar to the following screenshot:
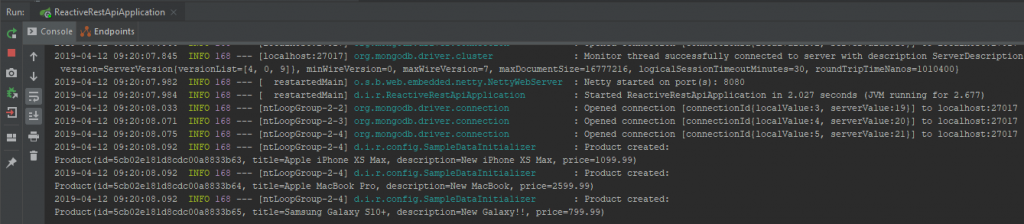
Here you can see that the application created three products with the ids:
- 5cb02e181d8cdc00a8833b63
- 5cb02e181d8cdc00a8833b64
- 5cb02e181d8cdc00a8833b65
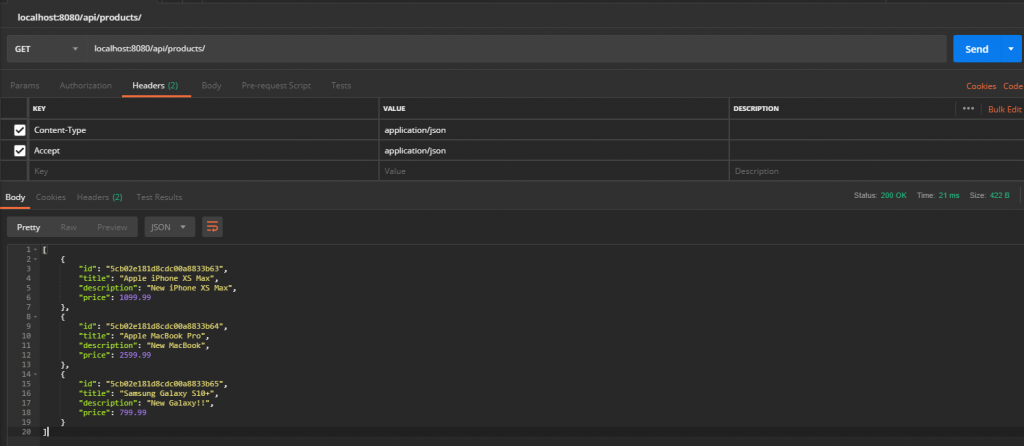
Now, let’s open Postman to query our service. First, let’s get all the products in our database.
Choose GET and in the address bar write: http://localhost:8080/api/products – you should get all the three products created in your own database:
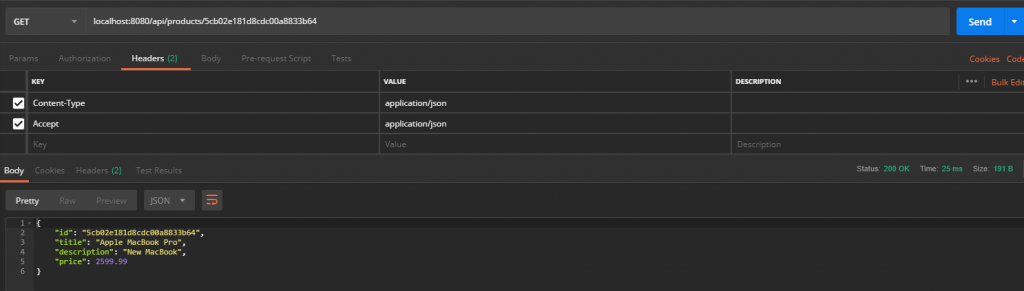
Next, choose one product ID and run a GET query to get its information as: http://localhost:8080/api/products/5cb02e181d8cdc00a8833b64
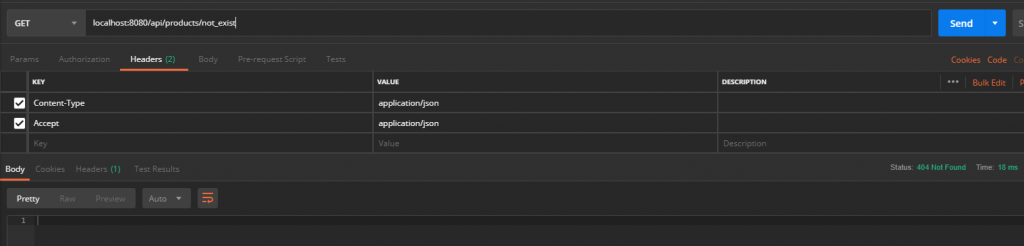
If you try to add an ID which is not exist, you will receive a 404 response:
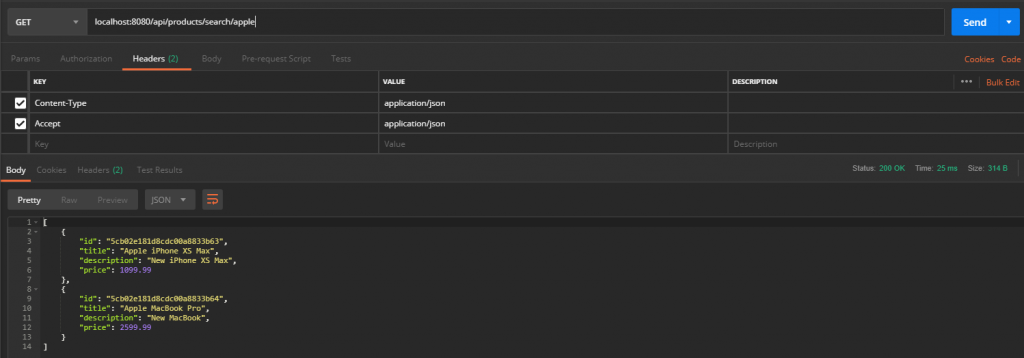
Searching for products is working as expected as well as: http://localhost:8080/api/products/search/apple
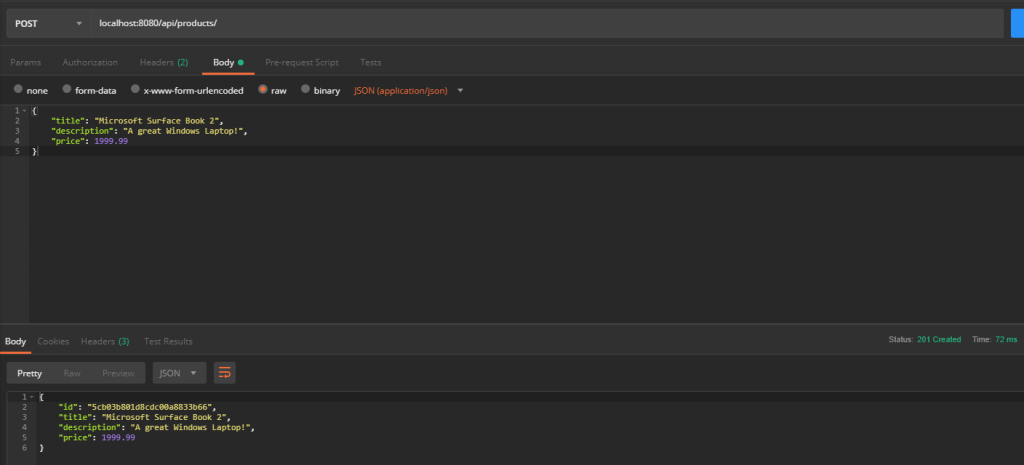
Now let’s change the HTTP action to POST and create a new product, in the Headers add the header: Content-Type with the value application/json and add the following body:
{
	"title": "Microsoft Surface Book 2",
	"description": "A great Windows Laptop!",
	"price": 1999.99
}
You should receive a 201 Created response with the new product (with a product ID):
Now, if you GET all the products again, this time you will get four products.
I will keep it to you to try the update (PUT) and delete products.
Summary
In this tutorial, we show you how it is simple to create a reactive REST APIs using Spring WebFlux.
The full source code can be found in the following GitHub repository: https://github.com/iseif/reactive-rest-api